
“Flutter navigation shapes how users feel while using your app. From simple Navigator flows to advanced Router and go_router setups, it ensures smooth, intuitive journeys. Proper routing, deep linking, and structured routes make apps predictable, reliable, and enjoyable across mobile and web.”
Flutter navigation is one of those topics that quietly decides whether your app feels smooth and intuitive or frustrating and confusing. Users may never talk about navigation when it works well, but they notice immediately when it does not. From simple screen transitions to complex deep linking across mobile and web, Flutter offers powerful tools to handle it all. Understanding how to use them properly can completely change the quality of your app.
This guide walks you through Flutter navigation and routing in a clear, practical way. Whether you are building a small app or a large-scale product, you will learn how to choose the right approach, structure your routes, and create a navigation experience users actually enjoy.
What Is Navigation and Routing in Flutter?
Navigation is how users move between screens in your app. Routing defines how those screens are organized and how the app responds when a user requests a specific page, such as through a deep link or browser URL.
Flutter provides a consistent navigation layer that works across Android, iOS, and the web. This abstraction allows developers to focus on user experience rather than platform-specific behavior. Good routing ensures users always know where they are, how they got there, and how to go back without confusion.
Why Navigation Is the Backbone of Every Successful Flutter App
Navigation is not just a technical detail. It shapes how users feel while using your app. Smooth transitions build trust. Logical back behavior creates confidence. Broken deep links or confusing stacks lead to frustration and app abandonment.
A well-designed navigation system also makes your codebase easier to maintain. As apps grow, clean routing structures help teams add features without breaking existing flows. This is especially important for products built by a professional Mobile App Development Company, where scalability and long-term maintenance matter just as much as initial launch.
Imperative vs Declarative Navigation in Flutter
Flutter supports two main navigation styles, and understanding the difference is key.
Imperative Navigation (Flutter 1.0)
This approach uses direct commands to move between screens. You push a route to move forward and pop a route to go back. It is simple and works well for smaller apps.
Common methods include:
- Navigator.push()
- Navigator.pop()
- Navigator.pushReplacement()
Imperative navigation treats routes like a stack. Each new screen sits on top of the previous one, and pressing back removes the top screen.
Declarative Navigation (Flutter 2.0)
Flutter 2.0 introduced a declarative approach where navigation is driven by app state. Instead of telling the app where to go, you describe what the navigation stack should look like based on the current state.
This model is more powerful and better suited for:
- Deep linking
- Web URL synchronization
- Complex navigation flows
Flutter 1.0 vs Flutter 2.0 Navigation
Flutter 1.0 handled navigation in a very direct and hands-on way. It relied entirely on the Navigator widget, where screens were managed through a simple stack. Developers pushed a route to move forward and popped a route to go back. Routes were either named or anonymous, which worked well for small and medium-sized apps. However, this approach had limitations. Deep linking support was minimal, managing complex user flows became difficult as the app grew, and web navigation lacked proper URL synchronization. While effective at the time, Flutter 1.0 navigation often felt restrictive for modern, large-scale applications.
Flutter 2.0 completely reshaped this experience by introducing a more thoughtful and scalable navigation system. Instead of treating routes as temporary stack entries, Flutter 2.0 introduced Pages as immutable representations of routes, making navigation more predictable and state-driven. The Router took control of how navigation behaves, while the RouterDelegate became responsible for responding to changes in app state and rebuilding the navigation stack accordingly. The RouteInformationParser allowed Flutter apps to convert URLs directly into meaningful app state, unlocking powerful deep linking and web support. Meanwhile, the BackButtonDispatcher ensured consistent and reliable back button behavior across platforms. Together, these improvements made Flutter navigation feel smoother, more reliable, and far better suited for complex apps that need to scale across mobile and web.
| Feature | Flutter 1.0 | Flutter 2.0 |
|---|---|---|
| Navigation Approach | Imperative, stack-based | Declarative, state-driven |
| Core Component | Navigator | Router + Navigator |
| Route Representation | Named or anonymous routes | Immutable Pages |
| Deep Linking Support | Limited | Strong and flexible |
| Web URL Sync | Not fully supported | Fully supported |
| State-Based Navigation | No | Yes |
| Back Button Handling | Basic pop behavior | BackButtonDispatcher |
| Scalability | Suitable for small apps | Ideal for large, complex apps |
| Predictability | Developer-controlled | State-controlled |
| Cross-Platform Experience | Mobile-focused | Mobile and web-friendly |
Understanding the Navigator Widget
The Navigator is the heart of Flutter’s navigation system and plays a crucial role in shaping how users move through your app. It manages routes using a familiar stack-based model, where each screen represents a route placed on top of the previous one. When a new route is pushed, it becomes the active screen, and when it is popped, the user naturally returns to the previous screen. This flow feels intuitive because it mirrors how people expect mobile apps to behave, creating a sense of comfort and predictability from the very first interaction.
What makes the Navigator especially powerful is its simplicity. It allows developers to control navigation with clear, direct actions while maintaining smooth transitions between screens. For users, this means fewer surprises, faster understanding, and a more enjoyable experience. For developers, it offers a clean and reliable way to manage movement across the app without unnecessary complexity.
The Navigator Is Ideal For
- Simple screen transitions
Perfect for moving between basic pages like home, details, and settings without complex routing logic. - Modal flows
Works seamlessly for dialogs, bottom sheets, and temporary screens that appear and disappear without disrupting the main flow. - Smaller apps without heavy deep linking
Ideal for apps that do not rely heavily on web-style URLs or advanced deep linking and instead focus on straightforward user journeys.
In short, the Navigator shines when clarity and ease matter most. It keeps navigation natural, reduces cognitive load for users, and provides a solid foundation for apps that value simplicity and smooth interaction.
Named Routes vs Anonymous Routes
Named Routes in Flutter
Named routes bring structure and clarity to navigation, especially as your app begins to grow. Instead of navigating by directly referencing widgets, routes are defined using string identifiers and registered inside MaterialApp. This allows developers to navigate to screens from anywhere in the app using a simple route name. The result is cleaner code, better organization, and a navigation flow that feels intentional rather than scattered.
One of the biggest strengths of named routes is consistency. Because all routes are defined in one place, it becomes easier to manage changes, track navigation paths, and avoid duplication. For teams working on larger apps, this centralized approach reduces confusion and makes long-term maintenance far less stressful.
Benefits of Named Routes
- Better code reuse by referencing routes with simple strings
- Centralized route management that keeps navigation organized
- Cleaner navigation calls that improve readability and structure
Anonymous Routes in Flutter
Anonymous routes take a more direct and flexible approach. They are created on the fly using MaterialPageRoute, allowing developers to push new screens without predefining them. This method feels fast and lightweight, making it ideal for simple apps or early-stage projects where speed matters more than structure.
However, as an app grows, anonymous routes can become harder to track. Because routes are scattered throughout the codebase, managing navigation logic can feel messy over time. That said, for quick transitions or experimental features, anonymous routes still shine.
Anonymous Routes Work Well For
- Quick transitions between screens
- One-off screens that do not need reuse
- Prototypes and small projects where simplicity is key
| Feature | Named Routes | Anonymous Routes |
| Route Definition | Defined with string names | Created on the fly |
| Setup Location | Centralized in MaterialApp | Defined inline |
| Code Organization | Clean and structured | Flexible but scattered |
| Reusability | High | Low |
| Best For | Large and scalable apps | Small apps and prototypes |
| Maintenance | Easy to manage long-term | Can become difficult as the app grows |
| Navigation Calls | Simple and readable | Direct but repetitive |
| Scalability | Strong | Limited |
Deep Linking in Flutter
Deep linking is one of those features users may never consciously notice, yet it quietly shapes how seamless and modern your app feels. It allows users to land directly on a specific screen from a URL, push notification, email, or any external source, without forcing them to navigate step by step. In today’s app ecosystem, especially with Flutter apps running on mobile and web, deep linking is no longer optional. It is an expectation.
When deep linking is done right, users feel guided and respected. They tap a link and arrive exactly where they intended to go. When it is done poorly, the experience feels broken, confusing, and frustrating. Flutter recognizes this importance and provides multiple ways to handle deep linking based on app size and complexity.
How Flutter Supports Deep Linking
Flutter offers strong deep linking support through modern navigation tools designed to scale as your app grows.
- Navigator 2.0
Navigator 2.0 introduces a declarative, state-driven approach to navigation. Instead of simply pushing and popping routes, the app’s navigation stack is built based on the current state. This makes it much easier to map URLs directly to screens, especially for web apps and complex user flows. - Router API
The Router API gives developers full control over how route information is parsed and displayed. It connects platform-level URLs to in-app navigation, ensuring that browser address bars, back buttons, and deep links stay perfectly in sync. This is a major step forward for Flutter apps that need reliable web and mobile deep linking. - Declarative Routing Packages
Packages like go_router simplify deep linking by handling URL parsing, back stack management, and route transitions automatically. These tools are especially valuable for large applications, where manual deep link handling can become overwhelming and error-prone.
Choosing the Right Deep Linking Approach
For simple apps, basic deep linking using named routes or minimal Router configuration is often enough. These apps typically have limited screens and straightforward navigation paths, making implementation fast and effective.
For larger or growing apps, advanced routing solutions are strongly recommended. As screens, user states, and platforms increase, declarative navigation and robust deep linking become essential. They ensure consistency, prevent navigation bugs, and create an experience that feels smooth across Android, iOS, and the web.
Deep linking is not just about opening a screen. It is about meeting users exactly where they are and guiding them forward without friction. When implemented thoughtfully in Flutter, it transforms navigation into something invisible, reliable, and deeply satisfying.
Using go_router for Modern Flutter Apps
As Flutter applications grow in size and complexity, navigation can quickly become overwhelming if it is not handled thoughtfully. This is where go_router truly shines. Built to work seamlessly with Flutter 2.0, go_router simplifies declarative navigation and removes much of the friction developers face when managing routes, deep links, and platform-specific behavior. It allows you to focus on building meaningful experiences instead of wrestling with navigation logic.
What makes go_router especially powerful is how naturally it fits into Flutter’s declarative mindset. Instead of manually pushing and popping routes, you define where your app can go and let the router handle how it gets there. This approach feels cleaner, more predictable, and far easier to scale.
What go_router Handles for You
- Deep links
go_router maps URLs directly to screens, allowing users to open specific pages from notifications, emails, or external links without confusion. - Web URLs
It keeps browser URLs in sync with your app state, making Flutter web apps feel native and reliable. - Back stack management
Navigation history is handled automatically, ensuring back and forward actions behave exactly as users expect. - Named routes
Routes are clearly defined and easy to reference, improving readability and reducing navigation errors.
Root Routes vs Nested Routes
Understanding the difference between root and nested routes is essential when working with go_router. This distinction plays a huge role in how users experience navigation and how predictable your app feels.
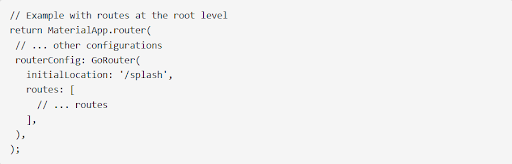
Root Routes
Root routes act as the main entry points of your application. They represent top-level screens such as splash screens, authentication flows, or landing pages. When a user is on a root route and presses the back button, the app exits. This behavior matches user expectations and clearly signals the end of a navigation journey.
Root routes are ideal for defining the overall structure of your app and controlling its main navigation flow.
Nested Routes
Nested routes live inside parent routes and create a layered navigation experience. Instead of closing the app, pressing the back button takes users back to the previous screen within the same flow. This is especially useful for multi-step processes, dashboards, and feature-based sections.
Nested routes automatically maintain the back stack, making transitions feel smooth and intentional. They help users stay oriented and reduce frustration caused by unexpected exits or lost navigation history.
Why Proper Route Structure Matters
Poorly structured routes can lead to confusing back behavior, broken deep links, and unpredictable navigation flows. By thoughtfully organizing root and nested routes with go_router, you create an experience that feels stable, intuitive, and user-friendly.
When navigation works quietly in the background, users stay focused on what matters most. That is the real power of go_router in modern Flutter apps.
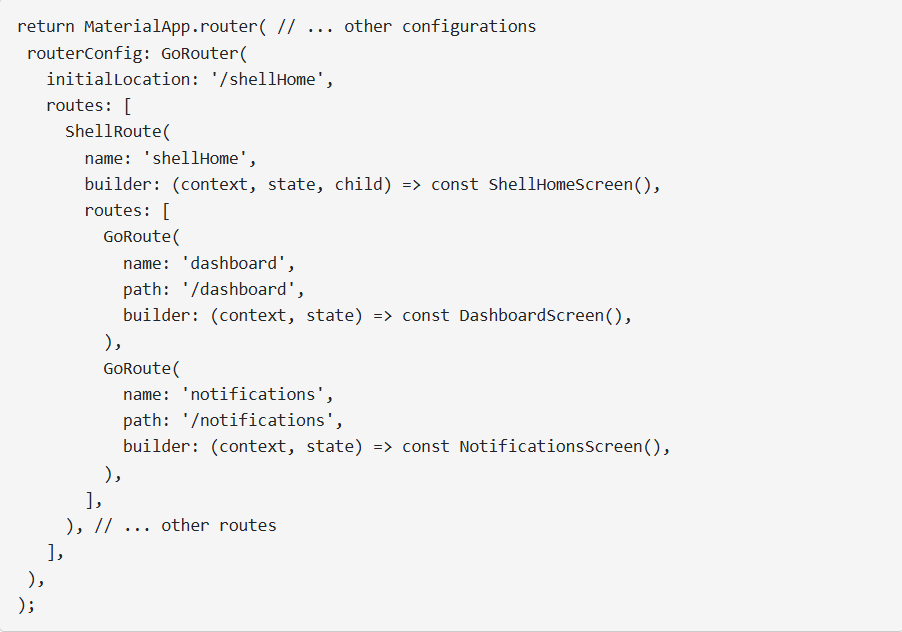
Advanced Navigation with ShellRoutes
ShellRoutes take routing to the next level. They allow you to group related routes under a shared layout or shell.
What Makes ShellRoutes Powerful?
ShellRoutes provide:
- Modular navigation structure
- Reusable UI shells
- Cleaner separation of concerns
They are perfect for apps with:
- Bottom navigation bars
- Dashboards
- Authenticated sections
By encapsulating related screens, ShellRoutes make your app easier to scale and maintain.
How Flutter Navigation Works Behind the Scenes
The navigation flow typically follows these steps:
- Route information is parsed into app-specific data.
- The router delegates updates app state.
- The router rebuilds the Navigator.
- The Navigator displays the updated list of pages.
This flow ensures that navigation always reflects the current state of your app, making it predictable and reliable.
Best Practices for Flutter Navigation
- Keep routes organized and predictable
- Use declarative navigation for complex apps
- Avoid putting all routes at the root level
- Plan deep linking early in development
- Test navigation flows across devices and platforms
Good navigation design saves time, reduces bugs, and creates happier users.
Final Thoughts
Flutter gives developers incredible flexibility when it comes to navigation and routing. From simple Navigator-based flows to advanced declarative systems with go_router and ShellRoutes, there is a solution for every app size and complexity.
The key is choosing the right approach early and structuring your routes with growth in mind. When navigation feels effortless, users stay longer, explore more, and trust your app. And that is where great apps truly stand apart.
Frequently Asked Questions
What is the difference between Navigator and Router in Flutter?
Navigator is best for basic navigation, while Router is designed for complex, state-driven navigation and deep linking.
Is Flutter 2.0 navigation better than Flutter 1.0?
Yes. Flutter 2.0 introduces declarative navigation, better web support, and more control over routing behavior.
What is go_router used for?
Go_router simplifies declarative routing, deep linking, and URL synchronization across platforms.
When should I use ShellRoutes?
ShellRoutes are ideal for apps with shared layouts like dashboards or bottom navigation structures.
Can Flutter handle deep linking on iOS, Android, and the web?
Yes. With Flutter 2.0 and modern routing solutions, deep linking works consistently across all platforms.